ANATOMY OF AN INLAY CARVING
USING THE TURBO-CARVER® HAND PIECE SYSTEM |
|
| 
Step 1 - Create a design on a copy machine or computer printer. Computers are ideal since you can size and scale much easier than a copy machine. Apply glue stick to the back of the paper stencil then apply to wood, bone or stone. | 
Step 2 - Push out any air bubbles that might get trapped under the stencil. There are other stencil options available, including solvent transfers, mylar, water slide decals and stamps. | 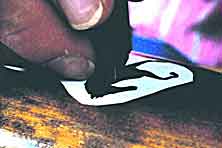
Step 3 - Using straight carbide burs, route entire outline of design to a depth of 1/8" to 1/16". Cut along the inside edge of the design. You can always cut more material to reach the line but it is impossible to add. The 1701 is good for areas with little detail. Precede with the 699 then the 7611 carbide burs as the details get finer. | 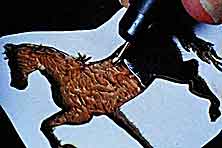
Step 4 - Use the #4 through #1 carbide burs to remove material from within the outline. The rougher the bottom of the cavity the better. | 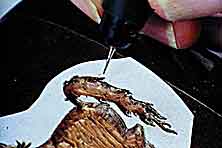
Step 5 - The 7611 sharp tapered bur is used to add detail like hair to the outline. | 
Step 6 - Use the tooth brush to clear out any leftover material that might mix with the casting resin. | 
Step 7 - Lay a wet paper towel over the stencil to remove what remains from surface of the wood. Leave the towel on long enough to soften the glue. | 
Step 8 - Prepare casting resin by adding the required amount of pigment and cataylst than pour into the cavity. Pigments can be added to simulate Ivory, Mother of Pearl and every color under the sun. Turbo Carver can also provide you with atomized metal powders to add the casting resin. Pour the casting resin to a level about 1/16" above wood surface. This is necessary because the casting resin will shrink some as it cures. |
| |
 | | |
| 
Step 9 - Sand or file the cured resin level, then polish with progressively finer grits of sand paper. |
| |
More Ideas on how to inlay http://www.arizonagourds.com/inlace.html
Information on Cold Casting with Atomized Metal Powders